Questions about hörbert
Prerequisite: You have a hörbert model from October 2021 with a rotary knob for switching on/off.
If you still have an hörbert with a toggle switch, you can have it updated by us or upgrade it yourself with our DIY upgrade kit.
Three preparatory steps
- Activating the microphone function
- Edit the memory card: Define one or more playlists on which voice recordings are to be saved.
- Switch on hörbert, start recording and save.
Activating the microphone and editing the memory card in browser set mode
If your hörbert does not yet have the Butterfly firmware, we recommend updating the firmware. Here you will find the necessary steps for a firmware update and the firmware file to download. Once the Butterfly firmware has been successfully installed on your hörbert, proceed as follows. At the bottom of this FAQ you will also find the steps without Butterfly firmware or Browser Set Mode.
Start hörbert’s Browser Set Mode
- Switch on hörbert and wait until it plays.
- Inside hörbert, press the small SET button to the right of the hörbert logo on the green circuit board. hörbert emits an ascending signal tone and opens its own WLAN network.
- Go to your Wi-Fi settings on your smartphone, tablet or computer. hörbert appears there as a new Wi-Fi network.
Connect with hörbert’s WLAN. The password is: hoerbert
- Now start a web browser on your mobile phone, tablet or computer, e.g. google chrome, Safari, Firefox, etc.
Type in the following address: http://hoerbert.local
The hörbert browser set mode opens, which looks like the following image in the mobile view. Here you will also find an

Open the MICROPHONE item in the menu and activate the function there.
Also set the sensitivity of the built-in microphone there. The higher the value, the more sensitive the voice microphone will react and the better the recording will be audible in the end, even if you are at a slightly greater distance from hörbert.
Open the PLAYLISTS menu item and select one of the coloured playlist buttons on which hörbert should save voice recordings. The recordings are always saved directly after the last file played before the start of recording. Repeat this step for all playlists on which voice recordings are to be saved.
NOTE: Make sure that there is at least one audio file on each playlist on which recordings are to be made.
If you have an accessible hörbert with only three large playlist buttons, go to the GENERAL menu item and then to the ‘Advanced settings’. Tick the ‘Show expert menu’ box. You will now find a new sub-item ‘EXPERTS’ in the main menu. Select this. Go to the ‘Recording settings’. Select the desired recording mode here, e.g. start recording by pressing and holding a playlist button.
Exit Browser Set Mode either by pressing the disconnect button on the end device or by pressing the SET button on the inside of the hörbert again. If you want to set the parrot mode, see the necessary steps for the parrot mode below before exiting the browser set mode.
- Wait until hörbert starts playing again and select one of the playlists that you have previously authorised for voice recordings.
Starting and stopping a recording with hörbert
- To start a recording, proceed as follows:
- On hörbert, press the black and grey buttons at the bottom of the front panel parallel to each other. The red light behind the microphone opening lights up. Recording has started, you can release both buttons. Or, on an hörbert with only three large playlist buttons, press one playlist button longer, depending on the selected recording mode.
- To end and save the recording, press the black button once. On an hörbert with only three playlists, you can stop and save the recording by briefly pressing a playlist button again.
The recording is played back immediately a few seconds after it is finished.
parrot mode of hörbert
The parrot mode at hörbert is a special function that allows you to record your own voice on all playlists and listen to it immediately afterwards, but hörbert deletes this recording immediately after listening, unless the playlist was previously authorised for voice recording. Just like a parrot that parrots what it hears. This is a fun gimmick for young and old alike and is great fun to play with. This function is also useful in speech therapy and for speech development. Direct repetition trains hearing and self-perception – key elements in speech therapy.
How to activate the parrot mode on hörbert
- You need the Browser Set Mode from hörbert for activation.
- Start the browser set mode as described above
Go to the GENERAL menu item and then to the ‘Advanced settings’. Tick the ‘Show expert menu’ box. You will now find a new sub-item ‘EXPERT’ in the main menu. Select this. Go to the ‘Recording settings’. Switch on the parrot mode here.
- Exit the browser set mode via the disconnect button or press the SET button inside hörbert to return to hörbert playback mode.
You can now make voice recordings in all playlists using the built-in microphone. The recordings are only saved if hörbert was playing a playlist in which voice recordings are permitted when the recording was started.
Enable voice recording without the Butterfly firmware
If the Butterfly firmware is not yet running on your hörbert, you can still carry out all the necessary steps without the Browser Set Mode. However, without Butterfly firmware, you will need a computer and the hörbert software to edit the memory card. You can find the latest hörbert software on our website in the ‘Service’ section under ‘Software Downloads’. Download the software and install it on your computer.
By the way: The Butterfly firmware is already installed on all hörberts and also on all barrier-free hörberts with only three large buttons that we have been delivering since mid-November 2024.
Start the hörbert software. Select the correct hörbert model without toggle switch.
- Connect the hörbert memory card to your computer via an SD card slot or via an external SD card reader.
- The hörbert software recognises the card and displays it as a drive. Select the SD card as a drive in the hörbert software.
Click on ‘Read card’ and wait until the software has read in all the tracks and now displays the number of audio files on the coloured buttons.
- Now click on the coloured button on the screen that you want to release for voice recordings.
Select ‘Save voice recordings here’ at the bottom of the content window.
Close the window by clicking on the green tick in the top right-hand corner.
In the hörbert software main menu, go to ‘Extras’ and then to ‘Configure set mode’.
Select ‘Allow’ for Microphone and save the setting.
Eject the card properly using the green button to the right of the ‘Eject card’ display and wait until the hörbert software says that you can now disconnect the card from the computer.
- Insert the SD card back into hörbert and switch hörbert on.
- Start a recording by pressing the black and grey buttons at the same time until the red light at the front of the microphone opening lights up. You can then release the buttons.
- To end the recording, press the black button again.
Note: Recordings are not possible with an older hörbert 2011 model with a toggle switch for switching on/off. You can have your hörbert updated by us or upgrade it yourself with our DIY upgrade kit for hörbert 2011 if you want to make recordings with it.
If your hörbert already has the Butterfly firmware, an Internet radio recording works as follows:
- Connect to hörbert’s WLAN with your mobile phone, tablet or computer by switching it on and pressing the Set button inside. hörbert opens its own WLAN.
hörbert is now displayed as a WLAN network on your end device. Connect to it. The WLAN password is: hoerbert
Start an internet browser on your end device, e.g. Chrome or Firefox. Enter the following web address there:
- The hörbert browser set mode opens.
Tick ‘activated’ in the ‘WLAN’ menu item in the browser set mode.
- Select your home WLAN from the list and enter the WLAN password. Then click on ‘Save and test’
In the browser set mode, select a playlist in the ‘PLAYLISTS’ menu item that you want to share for web radio recordings. All recordings from the Internet will then be saved there one after the other.
Enter at least one valid web radio URL for this playlist. To do this, open the content list of the playlist that you have authorised for web radio recordings in the Set Mode browser. Click on ‘+ RADIO’ at the top of the track list.
- A keyword search for radio stations from which you can choose will open.
- If you know the exact streaming URL, you can also insert it in the text line below and save it.
- Exit the browser set mode. After a few seconds, hörbert will start playing from his loudspeaker again.
- Select the playlist with the web radio URL and click through to it.
- hörbert will indicate the search for the home WLAN and the URL with an ascending sequence of tones and will then play the radio station after a few seconds.
Start a recording by first pressing the black and then the grey button at the same time until the red light on the microphone opening at the front lights up. You can then release the buttons.
- To end the recording, press the black button again.
- The recording is saved at the end of the playlist that you have previously enabled for web radio recordings in browser set mode.
If you have an hörbert with only three large playlist buttons, you do not have a black or grey button to start and stop recording. You must first change the recording mode in the browser set mode in the ‘Expert menu’ under ‘Recording settings’ so that a recording starts, for example, when you press and hold a playlist button. And the recording ends when you press a playlist button again. See also our instructions for hörbert with Butterfly firmware from page 40.
If your hörbert does not yet have the Butterfly firmware, an Internet radio recording works as follows:
You can either upgrade to the Butterfly firmware if you want to use the simple method via the Browser Set Mode (see above). Or you can proceed as follows:
If no Butterfly firmware or newer is installed on your hörbert, you will need a computer and the hörbert software to edit the memory card. You can find the latest hörbert software on our website in the ‘Service’ section under ‘Software Downloads’.
- Download the software and install it on your computer.
Start the hörbert software. Select the correct hörbert model without toggle switch.
The hörbert software recognises the card and displays it as a drive. Select the SD card as a drive in the hörbert software and click on ‘Read card’.
Click on the coloured button on the screen that you want to share for Internet radio recordings.
Select ‘Save Internet radio recordings here’ at the bottom of the content window.
- Click on the green plus sign to the right of the word ‘URL’.
You will now receive a new text line in the track list at the end and can enter the streaming URL of your radio station there by double-clicking in the line. You must know the URL, there is no search for a suitable URL here. Save with ‘Enter’.
Close the window by clicking the green tick.
In the hörbert software main menu, go to ‘Extras’ and then to ‘Configure Wifi connections’.
- You can now save up to 5 WLAN networks by entering the WLAN name (without spaces) and the password and saving them.
Eject the card properly using the green ‘Eject card’ button and wait until the hörbert software says that you can now disconnect the card from the computer.
- Insert the SD card back into hörbert.
Turn hörbert on and wait until he plays.
- Then press the SET button inside of hörbert.
- Now press the orange button on the front of hörbert for approx. 10 seconds to read the WLAN data into the device. You will hear a confirmation tone when hörbert has done this.
- Then you can press the SET button inside again and wait for hörbert to play.
Switch on hörbert and select the button with the radio station. Navigate to the station.
- hörbert indicates the WLAN and station search with an ascending tone sequence. It may take a few seconds for hörbert to play the station.
Start a recording by pressing the black and grey buttons at the same time until the red light at the front of the microphone opening lights up. You can then release the buttons.
To end the recording, press the black button again.
- The recording is saved at the end of the playlist that you have previously enabled for Internet radio recordings in browser set mode.
If you have an accessible hörbert with only three large playlist buttons, you do not have a black or grey button to start and stop recording. You must first change the recording mode in the browser set mode in the ‘Expert menu’ under ‘Recording settings’ so that a recording starts, for example, when you press and hold a playlist button. And the recording ends when you press a playlist button again. See also our instructions for hörbert with Butterfly firmware from page 40
- However, to be able to use the Browser Set Mode, you must first install the Butterfly firmware on your hörbert. With a 3-button hörbert, the home WLAN can also only be saved via the browser set mode.
Here you find all information regarding a Firmware Update.
Prerequisite for Bluetooth recordings:
You have a hörbert model from October 2021 with a rotary knob for switching on/off. If you still have an hörbert with a toggle switch, you can have it updated by us or upgrade it yourself with our DIY upgrade kit.
Three preparatory steps
- Activating the Bluetooth and pairing special functions
- Editing the memory card: Define a playlist on which the Bluetooth recordings are to be saved. Attention: At least one audio file must already be present there.
- switch the hörbert to Bluetooth speaker mode and pair it with an end device, e.g. mobile phone, tablet or computer.
Activating the Bluetooth and pairing special functions and editing the memory card in browser set mode
If your hörbert does not yet have the Butterfly firmware, we recommend updating the firmware. Here you will find the necessary steps for a firmware update and the firmware file to download. Once the Butterfly firmware has been successfully installed on your hörbert, proceed as follows:
- Switch on hörbert, wait until he plays.
- Inside hörbert, press the small SET button to the right of the hörbert logo on the green circuit board. hörbert emits an ascending signal tone and opens its own WLAN network.
- Go to your Wi-Fi settings on your Bluetooth transmitter, i.e. your smartphone, tablet or computer. hörbert appears there as a new Wi-Fi network.
Connect to hörbert’s WLAN. The password is: hoerbert
- Now start a web browser on your Bluetooth transmitter, e.g. google chrome, Safari, Firefox, etc.
Enter the following address in the address bar: http://hoerbert.local
The hörbert browser set mode opens, which looks like the following image in the mobile view. Here you will also find a
Open the BLUETOOTH item in the menu and enable the Bluetooth and pairing function there. You need an active pairing function if you want to pair your hörbert with a previously unknown device. Once you have paired all the desired Bluetooth devices in your household with hörbert, you can also deactivate this pairing function here later.
Open the PLAYLISTS menu item and select one of the colourful playlist buttons on which hörbert should save Bluetooth recordings. The recordings always end up piece by piece at the end of the authorised playlist. Only one playlist can be enabled for Bluetooth recordings at a time.
If you have an accessible hörbert with only three large playlist buttons, go to the GENERAL menu item and then to the ‘Advanced settings’. Tick the ‘Show expert menu’ box. You will now find a new sub-item ‘EXPERT’ in the main menu. Select this. Go to the ‘Recording settings’. Select the desired recording mode here, e.g. start recording by pressing and holding a playlist button.
End the browser set mode either on the end device using the disconnect button or press the SET button inside the hörbert again.
- Wait until hörbert plays and then switch it off.
Switch hörbert to Bluetooth speaker mode
- Switch hörbert to Bluetooth speaker mode by switching it on using the rotary knob at the top and switching it off again within approx. 0.5 seconds. It is then not switched off, but goes into speaker mode and confirms this with an ascending sequence of beeps.
- hörbert now appears in the list of available Bluetooth devices on your mobile phone, tablet or computer.
- Connect with hörbert. You have 60 seconds to do this after switching on hörbert.
- Start an audio playback on your Bluetooth transmitter. This can be an audio file or a playlist from your streaming service, e.g. Spotify. Or simply a YouTube music video or an audio book.
- The sound is now played back by hörbert.
Starting and stopping a recording with hörbert
- To start a recording, proceed as follows:
- Press the black button on the front of hörbert and the grey button at the same time so that both buttons are pressed together briefly. The recording starts. Or, on an hörbert with only three large playlist buttons, press one playlist button longer, depending on the selected recording mode.
- To stop and save the recording, press the black button again. On an hörbert with only three playlists, you can stop and save the recording by briefly pressing a playlist button again.
- The recording was saved at the end of the playlist previously set in Browser Set Mode and can be accessed from there.
Tip: Start the recording on the hörbert first, then immediately start playback of the audio content on the Bluetooth transmitter to ensure the desired song or audio story is recorded from the very beginning.
How to activate Bluetooth recordings without Firmware Butterfly
If the Butterfly firmware is not yet running on your hörbert, you can still carry out all the necessary steps without using Browser Set Mode. However, without the Butterfly firmware, you will need a computer and the hörbert software to edit the memory card. You can find the latest hörbert software on our website in the “Service” section under “Software Downloads.” Download the software and install it on your computer.
Übrigens: Auf allen hörberts – einschließlich aller barrierefreien hörberts mit nur drei großen Tasten –, die wir seit Mitte November 2024 ausliefern, ist die Butterfly-Firmware bereits installiert.
Start the hörbert software. Select the correct hörbert model without toggle switch.
- Connect the hörbert memory card to your computer via an SD card slot or via an external SD card reader.
- The hörbert software recognises the card and displays it as a drive. Select the SD card as a drive in the hörbert software.
Click on ‘Read card’ and wait until the software has read in all the tracks and now displays the number of audio files on the coloured buttons.
- Now click on the coloured button on the screen that you want to share for Bluetooth recordings.
Select ‘Save Bluetooth recordings here’ at the bottom of the content window.
Close the window by clicking on the green tick in the top right-hand corner.
In the hörbert software main menu, go to ‘Extras’ and then to ‘Configure set mode’.
Select ‘On with pairing’ for Bluetooth and save the setting.
Eject the card properly using the green button to the right of the ‘Eject card’ display and wait until the hörbert software says that you can now disconnect the card from the computer.
- Insert the SD card back into hörbert.
Switch hörbert on and immediately off again within 0.5 seconds.
- hörbert is now in Bluetooth speaker mode and waits until you pair it with a transmitter and start audio playback on your transmitter (mobile phone, tablet, computer).
- The sound is now transferred to hörbert
- Start a recording by pressing the black and grey buttons at the same time until the red light at the front of the microphone opening lights up. You can then release the buttons.
- To end the recording, press the black button again.
Option 1 – with SD card reader on the computer
This is the fastest and best option if you want to transfer a large number of titles (e.g. more than two or three new titles)
- Open your file manager on the computer, e.g. Windows Explorer or macOS Finder.
Connect hörbert’s memory card to the computer. To do this, you need a separate, built-in SD card slot in the computer or a connection for an external SD card reader that you can connect to the computer. Many laptops, for example, have these connections here for external card readers (the 10 cent coin is for size comparison):
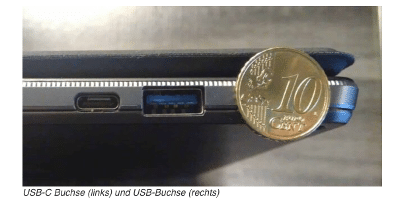
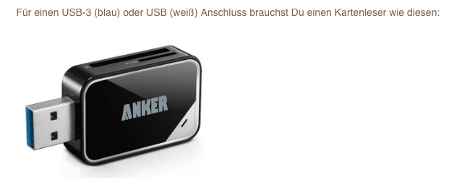
You can connect the following external USB-3 or USB card readers to the port on the right:

Find the drive of the memory card in the file manager. This is called e.g. DE (free German-language card) or INT (multilingual card) or CH (card in Swiss German).
Click on the SD card drive with the mouse. You will see the contents of the SD card. The folders 0 to 8 are important as these are where the MP3 files are stored.
If you are using your own SD card from another shop, you must first format it in FAT32 format (or FAT, MSDOSFAT, EXFAT) before using it for hörbert for the first time and create folders 0 to 8 in the root directory of the card.
If you have an hörbert with only 3 large playlist buttons, you only need to create folders 1 (red), 6 (light blue) and 8 (dark green).
Playlist assignment to folder no:
0 = dark purple
1 = red
2 = dark blue
3 = light green
4 = yellow
5 = dove grey
6 = light blue
7 = orange
8 = dark green
Open the desired folder in which you want to save new MP3 files by clicking with the mouse.
A file called ‘playlist.m3u’ can only be found there if you have already opened this playlist once in browser set mode. Leave this file there.
Important: Your own files that you want to add must be located directly on your end device and must not be stored in a cloud.
Now copy or drag & drop your own MP3, M4A, AAC, WAV, OGG, AIF or CDA files into the desired hörbert content folder
Important: No matter where you place the tracks in the file manager, hörbert always plays new tracks in alphabetical order at the end of a playlist first.
You can then change the playback sequence in browser set mode by moving the tracks within the playlist.
See our hörbert operating instructions from page 22 onwards.
You can access the operating instructions here:
https://en.hoerbert.com/wp-content/uploads/sites/5/2024/10/User_Manual_Butterfly_DE.pdf
Eject the card properly from the computer before disconnecting it from the computer and insert it back into hörbert.
Option 2 – via the Browser Set Mode.
See our user manual on page 12 (Starting the Browser Set Mode) and again on page 21 (adding a new audio file to a playlists)
This option is suitable if you only want to add one or two new tracks. This is because it takes a little longer to transfer many tracks via the hörbert WLAN. Or you can use this method if you don’t have a computer and SD card reader.
Adding new tracks via the browser set mode:
See our operating instructions on page 12 and from page 23.
You can access the operating instructions here:
https://en.hoerbert.com/wp-content/uploads/sites/5/2024/10/User_Manual_Butterfly_EN.pdf
My recording has disapeared or is not there. What went wrong?
Prerequisites for successful recordings:
The hörbert 2021 model – the one with the rotary knob for switching on and off – can record all sources it plays simultaneously.
– The prerequisite for this is that the memory card has been prepared in advance and the desired playlists have been defined where recordings are allowed.
– If you want to record Bluetooth streams, the Bluetooth and pairing functions must first be activated on hörbert.
– If you want to record internet radio, hörbert must first be connected to your home 2.4 GHz Wi-Fi network, and one or more suitable web radio URLs must be assigned to the desired playlist.
– If you want to make voice recordings using the built-in microphone, the microphone function must be activated on hörbert.
All the above-mentioned settings can conveniently be made using hörbert’s so-called Browser Set Mode. Please also refer to our user manual for hörbert with the Butterfly firmware.
Attention: there must at least be one audio file on the playlist already.
Once everything is set up and hörbert is turned on in standard mode or Bluetooth speaker mode, you can start a recording by pressing the black and the grey button simultaneously. This is the standard method for starting a recording. Press the black button again to stop and save the recording.
In Browser Set Mode, you can also configure in the Expert Menu that a recording should start when a playlist button is pressed and held. This is necessary, for example, for hörberts that only have three large playlist buttons and do not have a black or grey button.
As a visible indicator that a recording is in progress, the red LED behind the opening for the built-in microphone lights up. You can see the LED from the front of the hörbert device.
If the LED does not light up, the recording did not start. Please try again and make sure the recording function is enabled for the desired playlist.
There are also hörbert devices manufactured between October 2021 and December 2022 that do not have a built-in voice microphone. In this case, hörbert plays a confirmation tone to indicate that a recording is in progress.
Attention:
- In order to successfully start a voice recording or an Internet radio recording, you must first have pressed a playlist permitted for these recordings on the hörbert front page. For Internet radio recordings, hörbert must be playing the web radio station you want to record. To pair hörbert with a Bluetooth transmitter and start a Bluetooth recording, hörbert must be in Bluetooth speaker mode. You switch hörbert to this mode by pressing the rotary knob twice in quick succession. In other words: On-Off. hörbert is then not off, but in Bluetooth speaker mode and can now be paired with your transmitter.
At least one audio file should already be present on the playlist before the recording attempt.
Voice recordings are played once immediately after stopping and saved after the last played file in the respective playlist.
Bluetooth and web radio recordings are saved at the end of the playlist. ATTENTION. If a voice recording has not been saved, it is also possible that someone has activated parrot mode on your hörbert in browser set mode. For all playlists that have not previously been set to allow voice recordings to be saved there, the recording will then only be played once and then deleted directly by hörbert.
To stop the recording, press the black button. The recording will then be saved. If you have selected a different recording mode, e.g. start recording by pressing and holding a playlist button, you can also press the same button again to stop the recording. You can also turn the rotary control to stop recording. ATTENTION: The recording will not be saved if you switch off hörbert before you have properly stopped the recording.If your recording is not available afterwards despite following all the tips above, it could be because the contents or the file system of your memory card is fundamentally mixed up. In this case, you can try the following: Make a backup of the memory card by using your file manager to copy all the contents to a backup folder on your computer hard drive. Then format the memory card in FAT32 format (or if this is not selectable, also FAT, EXFAT, MSDOSFAT format.) Then copy the data 1:1 back to your memory card. Use the browser set mode to redefine which playlists you want to release for which recording types. Try the recording again. If you get stuck, please write to us using the contact form.
SET-Mode of hörbert
Update from November 2024:
First of all, the explanation below regarding SET mode is still correct. However, since November 2024, there is a new firmware called “Butterfly” for the hörbert model with a rotary knob for turning it on and off.
If this firmware is running on your hörbert, you also have the option to conveniently adjust all settings without using the hörbert software—directly via a web-based interface called **Browser Set Mode**.
With Browser Set Mode, you can:
– adjust all settings for your hörbert
– Select playlists for Bluetooth, voice, and internet radio recordings,
– Store internet radio URLs via a keyword search, and
– Even upload individual audio files to the memory card via hörbert’s Wi-Fi.
You can find out how to update your hörbert’s firmware to Butterfly and access the Browser Set Mode under **HÖRBERT FIRMWARE**.
For all details about hörbert and the many new possibilities the Butterfly firmware offers, check out our guide for a hörbert running the Butterfly firmware.
The SET mode is only available on the hörbert model 2021. All special functions of hörbert can be activated and deactivated via this mode. This SET template shows which functions can be set. It is always included in the delivery of a new hörbert:

How do you set hörbert to SET mode?
- Open the rear back panel with a coin and pull out the back panel.
- Switch on hörbert, it will then play normally through its loudspeaker.
- Inside hörbert, press the small button labelled “SET” once. The LED on the SET button is now solid green. hörbert is mute. The front buttons are now in SET mode.
- Set the desired functions. You can set all functions at once. You will find a detailed explanation of the individual functions below.
- Important: After setting the functions, you must press the SET button inside again so that they are saved.
- There is a time-out of about 5 minutes. So make all the settings you want within this time and press the SET button again at the end to save them.
- Then wait a few seconds until hörbert is playing normally again and only then switch it off or let hörbert continue to entertain you, just as you like.
What do the symbols on the SET template mean?
- Dark purple button: Activate the sleep timer by pressing it once. If you hear a single beep, the sleep timer is now activated. If you hear a double, slightly lower beep, the sleep timer is off. To activate it, simply press the dark purple button again. ON is indicated on the template by the green tick. OFF is indicated by the red XX.
- Red and dark blue button: Set the desired playing time of the sleep timer. Each click on the red button means +1 hour. You can set up to 7 hours of playing time, then the counter starts again at 0, indicated by a double beep. Each click on the dark blue button means: +10 minutes. For example, you can set a playing time of 2.5 hours by pressing the red button twice and the dark blue button three times.
- Light green button: Activate Bluetooth (single beep) / deactivate (double beep)
- Yellow button: Activate pairing (single beep) / deactivate (double beep). The first time you want to pair a new Bluetooth device, e.g. mobile phone or wireless headphones with hörbert, you must activate both Bluetooth and pairing. Once all the desired devices in the household have been paired, you can deactivate the pairing function on the hörbert by pressing SET -> yellow button -> SET. This should prevent unwanted third-party devices from connecting by mistake.
- Pigeon blue button (middle row far right): Delete all pairings.
- Light blue button: Activate volume limit (pp stands for piano. This quiet setting is active when the double beep is heard).
- Orange button: Activate WiFi for listening to Internet radio (single beep) / deactivate (double beep).
- Dark green button: activate voice microphone (single beep) / deactivate (double beep)
Further information:
To listen to Internet radio, you must first save the W-LAN data to the memory card with the hörbert software and read it into the hörbert. In addition, at least one streaming URL of an Internet radio station must be stored on one of the coloured buttons. See our instructions for hörbert or the corresponding FAQ for the Internet radio function.
In order for recordings to be made via Bluetooth WiFi or via the voice microphone, the memory card must also be processed with the hörbert software beforehand. You have to tell hörbert on which coloured buttons you want to allow which recordings. -> See also our blog article about hörbert’s recording functions.
The reset can only be performed on the hörbert 2021 model (hörbert with a rotary knob for turning it on and off). There are two ways to do this:
1. If your hörbert already has the Butterfly firmware, you can connect to hörbert’s Wi-Fi and access the *Browser Set Mode* (a web-based interface for hörbert) via a web browser on your phone, tablet, or computer. In the menu go to *GENERAL* -> *Advanced Settings* and you will find the option to *Reset to factory settings*. You can find all the details in our guide for hörbert with Butterfly firmware.
2. Or you can start SET mode by pressing the *SET button inside hörbert* and using the colorful buttons on the front to reset hörbert manually.
The reset has the effect that hörbert is reset to the factory settings. This SET template, which is supplied with a new hörbert, shows which functions can be activated/deactivated via which button in SET mode.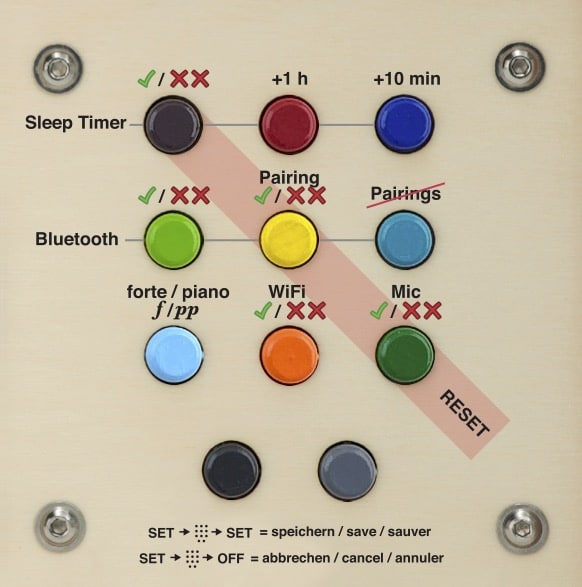
The reset goes like this – colour-coded by the slightly darker orange stripe across the SET template:
– switch on hörbert, it plays from its loudspeaker.
– press the small SET button inside hörbert once, the LED lights up green continuously and hörbert becomes mute. The front buttons are now in SET mode.
– Press the diagonal of the three buttons dark purple, yellow and dark green all together, starting with the first row on the far left at dark purple.
– A short series of beeps will sound to confirm.
– Important: At the end, press the SET button inside again to save.
Now hörbert is reset to the factory setting, i.e.:
– The sleep timer is off
– Bluetooth is off
– Pairing is off
– No previous pairings are stored and devices must be paired again.
– hörbert is set in Forte mode
– WiFi is off
– The voice microphone is off.
– hörbert has no more saved WLAN data. The WLAN data (network name and password) must be written to the memory card again via the hörbert software and read in in hörbert via the SET mode -> press orange button for approx. 10s -> press SET button again to save.
The reset has no influence on the other settings of the memory card. So if you have enabled certain buttons for Bluetooth / voice microphone / WiFi recordings, these enablements will remain after the reset. When Bluetooth and pairing, as well as WiFi, are re-enabled, streaming, radio listening and recording can resume.
Further notes on the SET mode:
If you have pressed the SET button inside once, you can now directly set all the desired SET functions at once and only press the SET button again at the very end.
There is a time-out in SET mode after about 5 minutes. If you have not pressed the SET button again within 5 minutes, hörbert switches off with a signal tone and the settings are discarded. It is therefore important to make the desired settings according to the SET template within this period of time and to press the SET button again at the end to save.
Your hörbert has fallen on the encoder? If you are confident enough to repair it yourself, you will find the instructions below. If you cannot repair the encoder, it is also available as a spare part in our shop. You can order it and replace it yourself with the help of the instructions below. If you don’t want to do it yourself, you can of course send hörbert to us for inspection and repair.
Encoder removal guide:
- Loosen the rotary knob on the encoder with a 2mm hexagon socket/bus
- Loosen the nut under the knob. You will need an 11mm wrench/socket for this.
- Then pull the encoder out of the mounting hole and loosen the release from the ribbon cable on the encoder itself. To loosen the release, you have to push the two protruding black lugs on the right and left of the cable with your fingernails. Then carefully pull out the cable.

- The ribbon cable can get stuck in the board on the other side.
- Remove the encoder and carefully try to straighten it again.
- If this does not work, order the spare part from our shop or send it to hörbert by arrangement.
Install repaired or new encoder:
- Plug the cable into the encoder. Make sure that the cable is plugged in as shown in the picture and that the blue side is not inserted with the wrong polarity. The white side must be at the top.
- Push the release on the cable shut:

- Insert the encoder into the mounting hole of the housing and put on the nut.
- Tighten the nut with the 11 mm spanner.
- Put on the rotary knob – with a distance of approx. 1 mm to the housing – and tighten it with the grub screw and the 2mm hexagon socket. Done!
Print text as PDF: Anleitung Einbau neuer Encoder
A) Possible Solutions if You Have a hörbert Without a USB-C Port:
- Even if you have already replaced the batteries or rechargeable batteries, please try again with a completely fresh pack of high-quality AA batteries. Sometimes an empty cell sneaks in during a battery change, or the batteries may already be discharged when purchased. If you are using rechargeable batteries, they may not be charging fully anymore, one cell could be defective, or the charger might have an issue.
- When replacing the batteries—especially if they have been completely removed from the device—gently press the ends of the opposite metal battery clips together with two fingers to ensure proper contact with the batteries. Please do this even if you think the batteries are already sitting firmly in place.
- The issue could also be related to the content on the memory card. If this might be the case, please send us the service file of your memory card for analysis along with a photo of the inner life of hörbert. Use our contact form from our 24×7 Helpdesk for sending us the files. Thank you!
How to generate the service file from your memory card:
1. Open the hörbert software.
2. Select your hörbert model.
3. Insert the memory card and wait until it appears in the software.
4. Click on “Read card”.
5. In the software menu go to “Help” ->”Service Tools” -> “Collect data for service”.
6. Choose a location to save the generated file.
7. The hörbert software will create a ZIP file and save it in the selected location.
8. Please send this ZIP file to us via email.
A firmware update may also help revive your hörbert, even if it no longer turns on. This is especially recommended if you received your hörbert 2021 model before April 2023, and have not yet performed a firmware update.
If you need further assistance, please contact our service team—ideally via the contact form.
B) Possible Solutions if You Have a hörbert with a USB-C Port and Battery Charging Circuit:
- The firmware Butterfly must be installed on your hörbert in order for the charging function to work correctly. If you have upgraded your hörbert with the USB-connection yourself, make sure that the newest firmware runs on your hörbert. See FIRMWARE UPDATE.
- Please check all connectors of the USB power supply and the battery compartment to ensure they are securely in place.
- Is the memory card fully inserted into the slot? If possible, try using a second hörbert memory card to test. You can also use any SD card between 4 GB and 512 GB, as long as it is formatted in FAT32 (or FAT, MSDOS FAT, EXFAT) beforehand and contains at least one audio file for each button.
- Does hörbert play when connected to mains power via a USB power adapter and USB-C cable? If not, do you have another power adapter and/or USB-C cable to test with?
- If rechargeable batteries are inserted: Remove one of the batteries from the battery compartment. Wait at least 30 seconds to allow any residual voltage to dissipate, then reinsert the battery.
Note: If batteries are in the battery compartment and hörbert is plugged into a power socket, the orange LED on the power supply board will blink to indicate that the batteries are charging.
If the LED blinks once and then turns off, the batteries are already fully charged.
If no batteries are inserted in the battery compartment and hörbert is connected to mains power, the orange LED will remain steadily lit.
If none of these steps solve the issue, you can check whether the problem is related to the USB connection:
- Carefully unplug the white ribbon cable that has a black connector attached to hörbert’s mainboard by gently pulling it upward.
- Now, all four metal battery clips on the mainboard will be exposed. Insert fully charged batteries – or ideally, a fresh set of four AA batteries for testing.
If hörbert now works, the issue is with the USB power supply. In that case, please contact us with your findings via the contact form.
You can find more useful information about hörbert’s USB port here:
BLOG article: hörbert’s USB connection
Please check that you have proceeded as follows:
Step 1 – Activation in SET mode:
Open hörbert’s rear panel with the help of a coin and pull it out.
Then switch hörbert on by pressing the volume control once. It will then play normally from the memory card.
2. Inside, press the SET mode button. hörbert falls silent and is now in SET mode.
3. press the light green button to activate Bluetooth. A single, bright beep must sound, which means: Bluetooth is activated.
4. Press the yellow button for pairing. A single, bright beep must sound, which means: Pairing is activated.
5. then press the SET button inside hörbert again to save. hörbert will then play back from its memory card.
6. Switch hörbert off again and close it.
Step 2 – Switching to Bluetooth Speaker Mode
7. Make sure that hörbert is switched off.
Then switch hörbert to Bluetooth speaker mode by pressing the on/off button twice. Leave a pause of only approx. 0.5 seconds between switching on and off.
hörbert will not play from its memory card after the first press. Instead, after the second press of the on/off switch, three ascending signal tones will sound as confirmation that hörbert is now in Bluetooth speaker mode.
Now you have 60 seconds to find and pair it with another player in the list of Bluetooth devices on your mobile phone.
We hope that these tips will solve the problem for you.
Please try the following after starting the hörbert software and inserting the SD card. In the software menu at the top, go to Extras -> Select destination manually. The card should then be selectable there.
If this is not possible, our development department has taken precautions:
You can simply select a file folder on your hard drive – and not your memory card. After that, the hörbert software works on the file folder as if it *were* a memory card. And if your memory card is usable with the card reader under your operating system and mounted correctly, you can simply copy the contents of this folder to the memory card afterwards. This feature is intended for when the memory card’s mount directory still doesn’t work for some reason, and when alternatives like “Sox” also fail.
The standard model from hörbert 2011 – without an additional module such as a sleep timer or Bluetooth module lasts for approximately 50 hours.
If the sleep timer module (automatic switch-off) is installed, the playing time is reduced by a few hours.
With the Bluetooth module installed, the playing time is reduced by up to 1/3 of the playing time of the standard model, i.e. about 35 hours.
So far, we have tested the new hörbert 2021 in our factory at medium volume in an endurance test with high-quality AA batteries.
In standard mode – i.e. when playing from its SD card – hörbert 2021 plays for approximately 38 hours.
If you use hoerbert in Bluetooth- oder WiFi Mode only, hörberts plays shorter, approximately 17-20 hours, depending on the batteries/accumulators you use.
All special functions such as sleep timer, Bluetooth, WiFi, and the microphone function are deactivated by default.
To be able to make recordings with hörbert, the following four steps are required first:
-
You need to activate the desired functions Bluetooth, WiFi, and microphone.
-
To use the internet radio feature, you must also save your WiFi credentials (network name and password) to hörbert and add at least one valid streaming URL of a radio station.
-
Finally, assign the colorful playlist buttons on which recordings are allowed. Note: there must be at least one audio file already saved in the playlist you want to add a recording to.
- If you want to use hörbert as a speaker for Bluetooth streams from your mobile phone, tablet or computer and record these streams at the same time, you must switch hörbert to Bluetooth speaker mode after having done all preparation settings first. To do this, hörbert must be switched off. Switch it on by pressing the rotary control at the top twice. Do not wait too long with the second press (approx. 0.5 seconds). hörbert emits an ascending tone sequence as confirmation that it is going into speaker mode. You now have 60 seconds to find it in the list of available Bluetooth devices on your Bluetooth transmitter and pair it.
General: Starting and stopping a recording
Once everything is set up, you can generally start a recording by pressing and holding the black button on hörbert and then briefly pressing the grey button. The red light behind the microphone hole will light up, and you can release the buttons.
To stop and save the recording, press the black button again.
If you’d like to change the standard recording mode — for example, if you’re using an accessible hörbert with only three large playlist buttons — you can do this in Browser Set Mode. There you can configure the device so that, for example, pressing and holding a playlist button starts the recording. To stop, simply press a playlist button again.
You’ll find detailed instructions for changing the recording settings in the expert menu in our guide for the 3-button hörbert with Butterfly firmware.
To activate the functions and enable playlists for recordings, you have two options:
Option 1: using Browser Set Mode – you don’t need a computer or a hörbert software
Browser Set Mode is only available for hörberts with the Butterfly firmware or newer.
Haven’t installed the latest firmware on your hörbert yet? Click here for the UPGRADE TO BUTTERFLY.
You’ll also find instructions on how to start Browser Set Mode at the link above, along with a short explainer video.
In the Browser Set Mode menu, you will see the colorful buttons of your hörbert displayed on your screen.
Click on the desired playlist button and enable Bluetooth, internet radio, and/or microphone recordings in that button’s settings.
-
Bluetooth recordings can only be enabled on one playlist.
-
Web radio and microphone recordings can be enabled on multiple playlists.
In the Browser Set Mode menu:
-
Go to Bluetooth to activate Bluetooth and enable pairing if you want to record Bluetooth streams.
-
Go to WiFi to enable the function and enter your WiFi credentials if you want to make web radio recordings.
-
To add a radio station: go to Playlists and click the “+RADIO” button to add a streaming URL to the desired playlist. You can also use the convenient keyword search to find suitable radio stations.
-
Go to Microphone to enable the built-in microphone for voice recordings.
Option 2: With a computer, SD card reader, and hörbert software
1.) Activating special functions directly on hörbert in SET mode:
-
Unscrew the back of hörbert.
-
Turn on hörbert – it will start playing from the memory card.
-
Press the SET button inside – hörbert will go silent. The LED on the SET button will glow solid green. The front buttons are now in SET mode.
-
Use the template included in your hörbert package (see attachment) to identify which button activates which function (e.g., Sleep Timer, Bluetooth, WiFi, Mic).
-
A single beep = function enabled.
-
A double beep = function disabled.
-
After selecting your desired functions, press the SET button again to save.
-
hörbert resumes playback, and the settings are now active.
2.) Special instructions for Internet Radio:
2.1) Editing the memory card with hörbert software on your computer
-
Install and launch hörbert Software version 3.x.x.
-
Select the “hörbert 2021” model and read the memory card.
-
In the Extras menu, select Configure WiFi connections.
-
Enter the exact name of your WiFi network and the password.
⚠️ It must be a 2.4 GHz WiFi. If connection fails, check your router settings.
⚠️ WiFi network name must not contain spaces.
-
Choose a colorful button that you want to assign to internet radio.
-
Click the “+” symbol next to “URL” in the content window and add a streaming URL (e.g.,
http://laut.fm/kinderradio) — preferably at the top of the list. -
Most MP3 podcast links also work.
-
Save by clicking the green checkmark at the top right, then eject the card using the Eject button before removing it from your computer.
2.2) Insert the card back into hörbert and import the WiFi data:
-
Turn on hörbert. It will start playing normally.
-
Press the SET button inside. hörbert will go silent, and the buttons enter programming mode.
-
Press and hold the orange button (WiFi) for approx. 10 seconds until you hear a short confirmation beep. The WiFi data will be imported and then deleted from the card for privacy.
-
Press the SET button again to save.
hörbert resumes normal playback.
Did you place the URL at the top of a playlist? When you press the corresponding button, hörbert will emit a series of ascending search tones while it connects to the internet radio station and then begins playback.
If it doesn’t work, check that WiFi is enabled (step 1) and that you used a valid streaming URL.
3.) Defining playlists for recording
With hörbert software, you can assign one or more colorful buttons where recordings are allowed — even without Butterfly firmware.
This can also be done while performing step 2 above, since the memory card is already connected to the computer.
-
Open the content window of the button where you want to allow microphone, Bluetooth, or internet radio recordings.
-
Check the appropriate box at the bottom of the window, e.g., “Allow microphone recordings here.”
-
Click the green checkmark at the top right to save and close the window.
You can repeat this for other buttons as well.
Note: Bluetooth recordings are only allowed on one button. That’s why you’ll see a round radio button instead of a checkbox.
There should be at least one file already on the playlist to allow proper navigation and recording.
Always eject the memory card using the Eject button before removing it from your computer. Then insert the card back into hörbert.
4.) Starting and stopping a recording
For voice recordings and internet radio recordings, you first need to select the playlist on hörbert that you previously enabled for such recordings in Browser Set Mode or via the software.
For Bluetooth recordings, this is not necessary — they are always saved at the end of the one playlist previously defined for Bluetooth.
To start a recording:
-
Press and hold the black button.
-
Briefly press the grey button.
-
The recording starts, and you can release both buttons.
-
To stop and save the recording, press the black button again.
Voice recordings made via the microphone are placed directly after the last played file in the selected playlist. hörbert will automatically play back the recording a few seconds after it is saved.
Bluetooth and internet radio recordings are always placed at the end of the assigned playlist.
For any questions, our service team is happy to assist you.
SET MODE TEMPLATE (included in your hörbert package)
Let me know if you’d like this in a downloadable format or need further adjustments (e.g., US/UK spelling or more technical vs. user-friendly tone).

The detailed instructions for the new hörbert with 9 or 3 playlist buttons can be found here: https://www.hoerbert.com/anleitungen/hoerbert/
Here you will find a suitable and detailed FAQ on the subject of Internet radio.
Here you can find a suitable and detailed FAQ on the subject of Bluetooth recordings
Here you will find a suitable and detailed FAQ on the subject of voice recordings
Réponse : Oui, c’est possible avec le nouveau modèle hörbert 2021.
Ce hörbert dispose d’une fonction d’enregistrement intégrée pour les flux Bluetooth – mais aussi pour la radio Internet ou les enregistrements vocaux via microphone. Toute source que hörbert peut lire peut aussi être enregistrée.
Pour transférer une playlist Spotify sur la carte mémoire de hörbert, procédez comme suit :
Avant tout, il faut activer le Bluetooth et le mode de couplage sur hörbert, puis modifier la carte mémoire pour définir la playlist sur laquelle les enregistrements doivent être stockés.
Cela peut se faire soit sur l’ordinateur avec le logiciel hörbert, soit sans ordinateur, à l’aide d’un smartphone ou d’une tablette via le Browser Set Mode
Le mode de configuration par navigateur est disponible pour hörbert 2021 avec le firmware Butterfly.
Vous pouvez à tout moment mettre à jour votre hörbert 2021 vers Butterfly s’il ne dispose pas encore de ce firmware.
Veuillez consulter attentivement les étapes de configuration à suivre dans notre rubrique FAQ sur les enregistrements Bluetooth.
Ensuite, vous passez hörbert en mode haut-parleur Bluetooth en appuyant deux fois sur le bouton rotatif, à 0,5 seconde d’intervalle. Vous avez ensuite 60 secondes pour coupler hörbert avec un smartphone, une tablette ou un ordinateur et lancer la lecture d’une playlist Spotify ou de tout autre fichier audio.
Pour enregistrer :
Appuyez sur le bouton noir et maintenez-le enfoncé.
Appuyez ensuite brièvement sur le bouton gris à côté. L’enregistrement démarre – la LED rouge derrière le microphone s’allume. Vous pouvez relâcher les boutons.
Pour arrêter l’enregistrement, appuyez à nouveau sur le bouton noir.
Si vous utilisez un hörbert à accessibilité simplifiée avec seulement trois boutons, vous pouvez adapter le mode d’enregistrement dans le mode de configuration par navigateur, par exemple en maintenant appuyée une touche de playlist pour démarrer un enregistrement, et en la pressant à nouveau pour l’arrêter.
L’enregistrement se trouve à la fin de la playlist que vous avez définie au préalable dans le mode de configuration par navigateur ou dans le logiciel hörbert pour les enregistrements de flux Bluetooth.
Amusez-vous bien à écouter, enregistrer et réécouter !
👉 Article de blog correspondant à cette question.
The microphone is built into the interior of the hörbert model.
This allows you to record your own voice and play it back using hörbert’s colorful buttons. When you order a hörbert, we install the microphone at the factory. It is very small and mounted on a tiny microphone board inside hörbert at the front bottom section. From the outside, only a small opening in the wooden case next to the hörbert logo is visible.
To record voice using the microphone, you first need to make two settings:
1. Choose which of hörbert’s colorful buttons should allow voice recordings.
You may not want to allow recordings on every button — for example, if one button contains a continuous audiobook or story that shouldn’t be interrupted.
You have two options to enable the microphone and define which playlists allow voice recordings:
a. Using the Browser Set Mode, a convenient web interface
You don’t need a computer, SD card reader, or hörbert software.
👉 [Watch the instructional video on how to start Browser Set Mode.]
Note: The Browser Set Mode is only available if your hörbert is running the Butterfly firmware (released in November 2024).
👉 [Go here for the FIRMWARE UPDATE]
b. Using the hörbert software on your computer
You can also use the hörbert software to choose which playlists allow voice recordings.
Open the hörbert software, select the new hörbert model, and read in the card.
Open the button where you want to allow recordings. At the bottom of the window, check “Allow voice recordings here”, then close the button window with the green check mark in the top right corner.
Note: There must be at least one audio file already saved in the playlist for a recording to be successful.
By the way, this is also how you define where recordings from Bluetooth streams or internet radio should be saved.
Always eject the SD card properly before removing it from the computer and reinserting it into hörbert.
2. Activate the microphone via SET mode on your hörbert
Here’s how:
-
Turn hörbert on. Press the small SET button inside hörbert. The colorful front buttons are now in SET mode.
-
Press the dark green button on the front once to activate the microphone.
The included SET template makes it easy to find the right button.
-
Press once: “on” (single beep)
-
Press again: “off” (double beep)
-
To save the setting, press the SET button inside hörbert again.
hörbert has now saved the setting and the microphone is active. -
Now you can close hörbert and switch it on again.
Starting a recording
If you’re in the allowed playlist, start a recording by pressing and holding the black button (bottom left), and then briefly pressing the dark gray button (bottom right).
You can then release both buttons while speaking.
Stopping a recording
To stop recording, press the black button again.
Discarding a recording
To discard a recording, end it by pressing the power switch and turning hörbert off.
Playing back a microphone recording
After a microphone recording, playback starts immediately.
The recording is placed directly after the track that was playing when the recording started.
👉 Related FAQ: How do voice recordings work with hörbert?
The answer is “Yes”:
The settings from the new hörbert can be made via the SET mode.
Inside the unit there is a SET button. When you press it, you can use the coloured buttons on the front and the SET template provided to set the following functions as desired:
- Sleep timer on/off, playing time in hours and minutes
- Bluetooth on/off, pairing mode on/off, delete all pairings
- WiFi on/off
- Microphone on/off
- piano/forte
- Reset to factory settings.
If you press the power button after making a change, all the changes you have just made are discarded.
If you press the SET button inside again after making a change, all the changes you have just made will be saved.
IMPORTANT:
WiFi, Bluetooth and microphone are initially deactivated in the factory setting. Only by setting them via the SET mode and after previously configuring the playlists in which recordings are allowed, can the functions be activated by an adult. The prior selection of the playlists that are allowed to save recordings is done via the hörbert software directly on the memory card.

You want all this for your own hörbert too? No problem! Please contact our service team in order to get an offer for an Upgrade.
Visual differences:
The new hörbert comes with a slightly different appearance and a brand new electronic interior.
The toggle switch for switching on/off no longer exists. Instead, the volume control can be pressed for electronic on/off.
The new hoerbert’s front panel has a small opening at the right bottom, behind which the microphone is hidden.
hörbert now has even less plastic. The coloured buttons on the front now also consist of wood!
New features:
- recording function:
All sources hörbert knows, it can also record on the memory card: Microphone (if built in), Bluetooth streaming and Internet radio. - Microfone:
Record speech and music in CD quality with the microphone and play it back directly from the memory card. - WiFi for Internet radio:
Connect hörbert to your W-Lan to play Internet radio stations with hörbert’s buttons. With the recording function, radio broadcasts can then be recorded and played back later from the memory card. - Pause function:
hörbert continues playing exactly where you switched it off. There is no need to fast-forward to the right place. - Even less plastics
The colourful keys are now wooden turned parts. hörbert thus contains less than 5% plastic. Only the circuit board and the components on it. That can’t be improved any more. - Even more space for replaying
The storage space on the SD card now goes further, because hörbert can play native mp3 and m4a files. That’s why more hours fit on the same card. Each of your memory cards will then hold up to 5 times the amount of content compared to the previous format. - Bluetooth Audio for headphones and Streaming
You can use hörbert with Bluetooth headphones or as a Bluetooth speaker. Simultaneous listening with up to two wireless headphones is possible. With a mobile phone or tablet, you can listen to content from streaming services on hörbert, e.g. from Spotify or audible.
This is already possible with your “hörbert 2011” if you have a built-in Bluetooth module.
What is new is that you can also record everything that hörbert plays as a Bluetooth speaker so that you can play it back again and again from the memory card.
What’s new is that you no longer have to pay anything extra for the Bluetooth functions. Bluetooth audio is now included in the price. Of course, the Bluetooth function can also be switched off completely, so that nothing transmits if you don’t want it to.
Proven and still available:
- Sleep Timer included
Set how long hörbert can play before it switches itself off. - Selectable additional volume limit included
piano/forte
hörbert comes ready to play.
Depending on your selection, a preloaded memory card is included with German, international, or Swiss German audio content for children. If you choose an accessible hörbert, you can also opt for a blank SD card or one with audio content for adults. The hörbert for seniors automatically includes the free memory card with content for adults.
We provide over two hours of carefully selected songs and stories.
Additionally, we include 4 AA batteries so you can start using hörbert right away after unpacking.
You are also welcome to use 4 rechargeable AA batteries in hörbert’s battery clips.
Important Note:
If you purchase a hörbert with an optional USB port and battery charging function, we also include a preloaded free memory card of your choice.
However, to operate hörbert via a power outlet, you will need the following accessories:
– USB power adapter
– USB-C cable
If you also want to use hörbert on the go, you will additionally need:
– 4 x rechargeable AA batteries (1.2V HR6)
You can find everything about hörbert’s USB port **HERE**.
We’ll agree on a price with you, because it always depends on what is broken.
If something is wrong with your hoerbert, please send us a note along with photos (<1.9 MB in size) to service (at) hoerbert (dot) com
As long as the decorated part is not broken, we’ll replace only other parts and you’ll get your own hörbert back, of course.
You might want to replace the handle, the loudspeaker, the on/off switch and the volume knob yourself. That’s okay, if you have the know-how and the tools to perform such a repair. If you don’t, contact us, so you can send your hörbert in for a repair.
When batteries leak, you will find traces of battery chemistry on the electronics (circuit board). You must cleanly remove these traces in order to get your hörbert back in shape.
Cleaning after leaking batteries:
Important safety instructions
Take care of your safety and that of your surroundings in the following activities! Only work with safety glasses! Only work with protective gloves! Don't touch anything else with your gloves on! Work with an open window and sufficient fresh air supply! Do not work near flames or ignition sources! Keep chemicals and tools away from children! This manual does not apply to other devices! Leave the repair to us, if you don't think you can take a step! Risk of injury: splashes of alcohol or battery chemistry in the eyes may cause serious eye injury. In the event of an accident, consult a doctor immediately. Fires may occur when working with high-proof alcohol. Have extinguishing agent ready. Alcohol can dry out your skin, so wear gloves! And again: Keep children away from chemicals and tools!
And so it goes:
- Pull the memory card out of the memory card holder. Check the contacts on the memory card. It may need to be replaced when it has received battery chemistry. You can try cleaning them with alcohol.
- Remove the electronics by loosening the 4 nuts on the board. Lift up the board and disconnect all 3 cables.
- Find all traces of battery chemistry on the top AND bottom of the board. You’ll need to clean it very carefully to stop the corrosion.
- Use plenty of isopropyl alcohol 70% (e.g. from the pharmacy): Drip the alcohol abundantly on all places where you find traces of battery chemistry. Soak everything. If the alcohol evaporates, drip more of it onto the board, even into the memory card holder.
- Use your toothbrush to scrupulously remove all traces of battery chemistry. Cotton swabs can also help. Important: NEVER scratch! Because if you scratch a trace or destroy a small component, it is very likely that the board is finally broken.
- When everything is clean, let the alcohol evaporate for an hour. Never use the electronics in wet condition.
- Now you can plug all cables back in where they were, insert the board again and screw it tight.
- Now insert the batteries and the memory card again and switch on audibly. Don’t forget to breathe.
There are two reasons for this: Either the contents of the memory card have got mixed up, or the remains of leaking batteries affect the electronics. (In this case: Problems with leaking batteries?)
- To compare problems with the memory card, you can use another suitable memory card, for example, or you can first back up all the contents of your hörbert card with the on-board resources of your computer: Simply copy all the contents of the memory card into a folder on your computer. You can use this backup later. Tip: The hörbert software can create a table of contents on page “2”, which you can save on your computer with the files on the memory card.
- The easiest way to”repair” a messed up memory card is to format it and reload it.
- Start the hörbert software on the computer, and check if you have the latest version (at the left of the bottom of page “1”: “Search for newer hörbert software”). If necessary, install the latest software while you’re at it.
- If you now insert your memory card into the computer and select it in the hörbert software, you can format the card with the “memory card tools”. Attention: By formatting all data on the memory card will be deleted irretrievably! Be especially careful not to select another drive of your computer or that may be plugged into your computer.
- After formatting, you can reload the card with the hörbert software as usual. As a test, it is enough to play 2-3 songs on each playlist to test the card. If you want to try again with your previous content, simply copy your backup copy from your computer back to the card.
Yes, since 12/2020 the hörbert software is also available for Linux (tested on Ubuntu >16.0.4) for download here:
The publishers of our supplied content offer even more beautiful music and stories – in some cases even free of charge.
You can find the sources here: hörbert’s preregistered contents
In addition there are many contents which you can buy as MP3 download or M4a download and which really belong to you. In Amazon and iTunes you can find them under the category “”Music downloads””. There is not only music, but also stories to download.
You can find even more contents for your hörbert here on our website
Yes, the current hörbert model reads SD cards between 4GB and 512GB in size.
Necessary preparation steps for the SD card so that hörbert can play it
- Your own SD card must be formatted in FAT32 (or FAT, MSDOSFAT, EXFAT) format. Caution: Formatting irrevocably deletes all data on the selected storage medium. So make sure that you are really formatting the correct memory card and that you have either made a backup beforehand or can do without the data stored on it!
- You must then create 9 playlist folders with the names 0 to 8 on the SD card.
You can find out exactly how it all works here:
To make sure that the card contains the necessary FAT32 file system, you can format your memory card with the hörbert software and then read it in again with the hörbert software. The software will then recognise that the card has ‘never been used with hörbert’ and will prepare it and create the necessary folder structure for the playlists.
You can also format the memory card in FAT32 format using your computer’s on-board tools. If this format is not available in your hard disk utility for formatting the SD card, you can also select FAT, EXFAT or MSDOS-FAT. If you have formatted the SD card with your computer’s on-board tools, you can then read it in with the hörbert software. The hörbert software asks whether it should prepare the card for use in hörbert. Confirm this. The necessary folder structure for the playlists will then be created. You can then use the hörbert software to transfer new tracks or delete old tracks.
Create folder structure on the SD card
If you are not using the hörbert software, you must create 9 folders for the nine playlists in the main directory of your SD card and name them from 0 to 8.
0 = dark purple button, 1 = red button, 2 = dark blue button, 3 = light green button, 4 = yellow button, 5 = pigeon blue button, 6 = light blue button, 7 = orange button, 8 = dark green button. It looks like this: 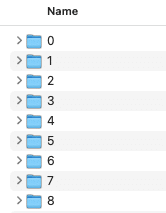
Note: For a hörbert with only 3 playlist buttons, you only need to create three folders (1 = red, 6 = light blue, 8 = dark green)
You can now copy and paste or drag and drop your own audio files into the respective folders. Possible formats: mp3, m4a, wav, ogg, flac, cda/cdda, aif/aiff
The playback sequence can be resolved by numbering the track names accordingly, e.g. 1_track name 2_track name 3_track name etc. or with spaces between the number and track name: 1 track name 2 track name 3 track name etc. Done! Now you can eject the card properly, disconnect it from the computer and test it in hörbert.
Editing the SD card in browser set mode (without computer and without SD card reader)
If the Butterfly firmware is already installed on your hörbert, you can also transfer new audio files via the browser set mode (via tablet, smartphone or computer). Here it is recommended not to transfer more than 2-3 new files at the same time, as it takes a little longer to transfer data via hörbert’s own WLAN than via the SD card reader on the computer.
Select one of the colourful playlist buttons in the browser set mode, then select ‘Content of the playlist’ and click on the blue ‘FILE’ button to select and transfer new audio files. You can then use the icon with the three dashes (see image below) to move the file to another position in the playlist: 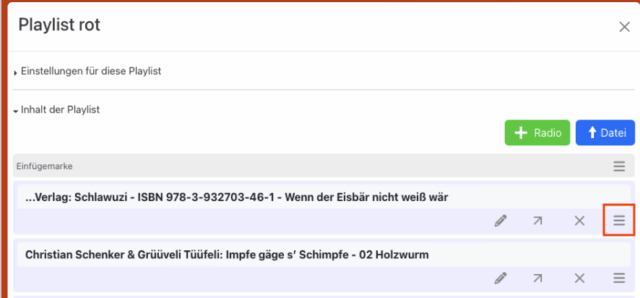
Attention: Please only ever use one method to edit the SD card, i.e. either the hörbert software or the browser set mode, as otherwise the contents of the card may get mixed up.
Note: Once you have edited or opened the playlist content on your SD card in browser set mode, hörbert creates a file called ‘playlist.m3u’ in the playlist. This ensures the correct playback sequence. New files that you then add to the playlist folders 0 to 8 via your computer’s file directory will always be played at the end of the playlist in alphabetical order. Afterwards, you can change the playback sequence via the Browser Set Mode, as described above.
If you have an older hörbert of the 2011 model:
SDHC cards between 4 and 32 GB are compatible with this hörbert.
Tip: Please pay attention to the speed class when purchasing. hörbert 2011 can play Class 4 or 6 memory cards without any problems. With some Class 10 cards, there may be brief stuttering or dropouts during playback. This happens very irregularly and not in the same place. This is because the particularly fast memory cards ‘clean up’ on the side. Unfortunately, we cannot predict which cards from which manufacturers will exhibit this behaviour, and even then it only occurs sporadically.
The following applies to both hörbert models:
We have noticed that the power consumption of some third-party cards is significantly higher than that of our supplied Class4 SDHC card, which is manufactured according to our specifications. Unfortunately, it is generally not possible for us to make valid functional statements about individual brands or even individual batches within a brand, as the manufacturing processes vary too much and new controllers and processor chips are constantly being installed. We cannot know what is inside.
Each of the nine coloured buttons represents a list of songs or audio book chapters. By pressing the same button several times, you jump through that list track by track.
You find all details about hoerbert’s functions in our user manuals:
MANUALS
The metallic grey button is used for audible fast forward, the black button jumps back to the beginning of the current title. Pressing the black metallic button twice you will jump back one more title.
hörbert is made of natural materials, that’s why we can’t predict colors and texture of the wood, for example. Each hörbert is unique! Small discolorations or knot-holes leave their traces and are normal.
The answer is both yes and no.
The standard hörbert is a portable device and does not have a mains power connection. It runs on 4 x AA rechargeable or disposable batteries, which are widely available. A power adapter connection has been deliberately omitted to ensure that hörbert remains suitable for even the youngest users, always mobile, and free from the hazards of power sockets or cables.
However, since November 2024, there has also been a hörbert for seniors and a barrier-free hörbert. In this area, it is often necessary for hörbert to be used as a stationary device powered by mains electricity. Therefore, these models automatically come with a USB port and a battery charging function as standard.
For the hörbert designed for children, you also have the option to choose a USB port and compatible rechargeable batteries when purchasing.
Learn more about hörbert’s USB-C port in our BLOG ARTICLE ON THE USB CONNECTION.
Does hörbert have a USB port?
Yes, but not for USB sticks. It is used for operation via a USB-C cable and a USB power adapter plugged into a socket. If rechargeable batteries are also inserted in the internal battery compartment, they will be charged simultaneously when hörbert is connected to the socket via a USB-C cable. A practical feature. MORE INFO ABOUT THE USB PORT
Where are the audio contents stored?
hörbert works with a memory card in SD card format.
You need an SDHC card reader on your computer to save your own content to this memory card and to make changes to it.
Alternative option without a computer and without an SD card reader
Since the end of November, the Butterfly firmware has been available for all hörbert devices from October 2021 onwards. This is the model with a rotary knob for turning on and off. With this firmware, all settings for hörbert can be configured via the Browser Set Mode, a user-friendly web interface, which also allows you to add individual audio files or web radio URLs.
The software is included on the memory card of any new hörbert and is available for download on our website.
As we cannot guarantee that the most recent software version is on the memory card, we recommend to download it from our website:
System requirements:
PC or Mac (Intel), operating system: Windows 10 or higher, or Mac OS X from version 10.14, Linux (tested on Ubuntu
>16.0.4)
Screen resolution at least 1024×768 pixels
At least 4 GB free hard disk space
At least 2 GB main memory (RAM)
hörbert’s software accepts audio files of the following formats: .m4a .mp3 .wav .cdda/.cda .ogg .flac. .aiff/.aif
Please note that the hoerbert software can’t transfer copy protected files or audio tracks! However, it even helps you to transfer music and audio books directly from compact disks to hörbert’s memory card, so you don’t have to be a computer nerd to put manager hörbert’s content.
The wood, operating elements and electronics have been specifically selected and produced in a way to protect hoerbert and your children, when it gets a bit wild in the playroom. hörbert will go through interesting times and may even get some marks and scratches that can easily be corrected with a bit of sand paper. If hörbert should have an unfortunate fall and something gets broken, spare parts are available – because throwing hörbert away is out of the question. Of course, you can also send hörbert in for repair at any time, we will be happy to advise you.
Please always CONTACT US before sending your hoerbert in for repair.
hörbert is available in our online shop at https://www.hoerbert.com, as well as in selected customer shops, that you can also find on our homepage. No matter where you buy your hörbert, you can have it individually engraved. Just ask at your customer shop, we’ll engrave your hörbert for you while we produce it.
hörbert was designed to be operated by even small children (from the age of two years) themselves without the help of anybody. Only transferring content to hörbert and replacing batteries are tasks that are left to grown-ups. As hörbert already comes with lots of songs and audio books, you won’t have to sacrifice your first day with hörbert at your computer instead of giving it to your children.
We don’t recommend a minimum age for using hörbert. You may want to play lullabies to a baby, your two-year-old kid may be able to handle hörbert completely on his or her own. Maybe grandma or grandpa like to use hörbert as a pretty and simple music box, that’s also a task hörbert can handle.
Children use the colored buttons to select what to listen to next. Behind each of the nine colored buttons there can be several songs or chapters of a story. Skipping them works by pressing the same button several times. There’s one more grey button for an audible fast forward scan and one black one to jump right back to the beginning of the currently playing title. You can even jump further to the previous titles by pressing that ‘back’ button quickly in repeat. Finally, there is a rotary volume knob and a robust on/off switch.
Read all about hoerbert’s functions in our user manuals.
A CD with copy protection can normally be identified by the corresponding IFPI copy protection logo. It’s a black circle with a white triangle. You can find it here: https://de.wikipedia.org/wiki/Kopierschutz
A tip: It is recommended to read a CD first with a program like iTunes and import it to your computer. Then the transfer to hörbert’s memory card is even faster. ITunes also has a good converter that brings the tracks into the optimal format (m4a or better still mp3). This is similarly convenient under Windows with the Media Player, but you have to set the mp3 format there, because the hörbert software does not read files with the extension.wma. After importing into iTunes, you can drag and drop songs directly from the iTunes library to the corresponding playlist window in the hörbert software using the hörbert software.
A software is necessary to conveniently arrange the tracks in the playlists and in the correct order, because if you would simply copy MP3 files to a memory card, the player would still not know in which order it should play them from which button. Another advantage is that you can also use files in OGG, WAV or FLAC format and directly from audio CDs as source material, or other common formats, which is not possible with most MP3 players. Instead of referring to hörbert as an MP3, Ogg, WAV and FLAC Player, only the term “MP3 Player” can be used as category or generic name. Otherwise you would not find our hörbert in any shop, because there is not even a category for “Audio-Player”, but at most “MP3-Player”. The term “universal audio player for children” would of course be quite correct. But we have to meet the potential customers looking for a player and limit ourselves here to the term “MP3 player” as a generic term, although hörbert can do much more.
- Please insert a completely fresh set of new batteries or full batteries first, because even a poor power supply can be noticed by a croaking sound.
- Then we should exclude that it is only a loose screw, or that only the rear wall vibrates, because it should be tightened, for example. Therefore, please remove the sliding cover first. Then listen to the device at full volume with the rear panel open, whether it is still vibrating.
Is the problem still there?
- If yes, please try by laying it on the speaker grille by hand, whether it lies only on the speaker grille or the wooden frame on the speaker grille (and one of the 4 screws may be too loose there).
If you have a loose screw, you can tighten it yourself with feeling. This problem can be caused by differences in humidity and temperature when the wood”works” (expands or contracts slightly). Is the problem still there?
Yes. Small defects or scratches can even be removed with a fine sandpaper. The best way to repair major damage is to replace the affected parts so that stable and safe operation can be restored afterwards. For larger repairs you can send us your hörbert by prior arrangement. A complete housing replacement (i.e. replacement of the frame and the front using all your intact hörbert parts) can only be carried out in our workshop, as we can also carry out any necessary minor repairs – at the previously agreed flat-rate price, of course.